Author Archives: GCSDev

Cold Soil Vegetable Favorites

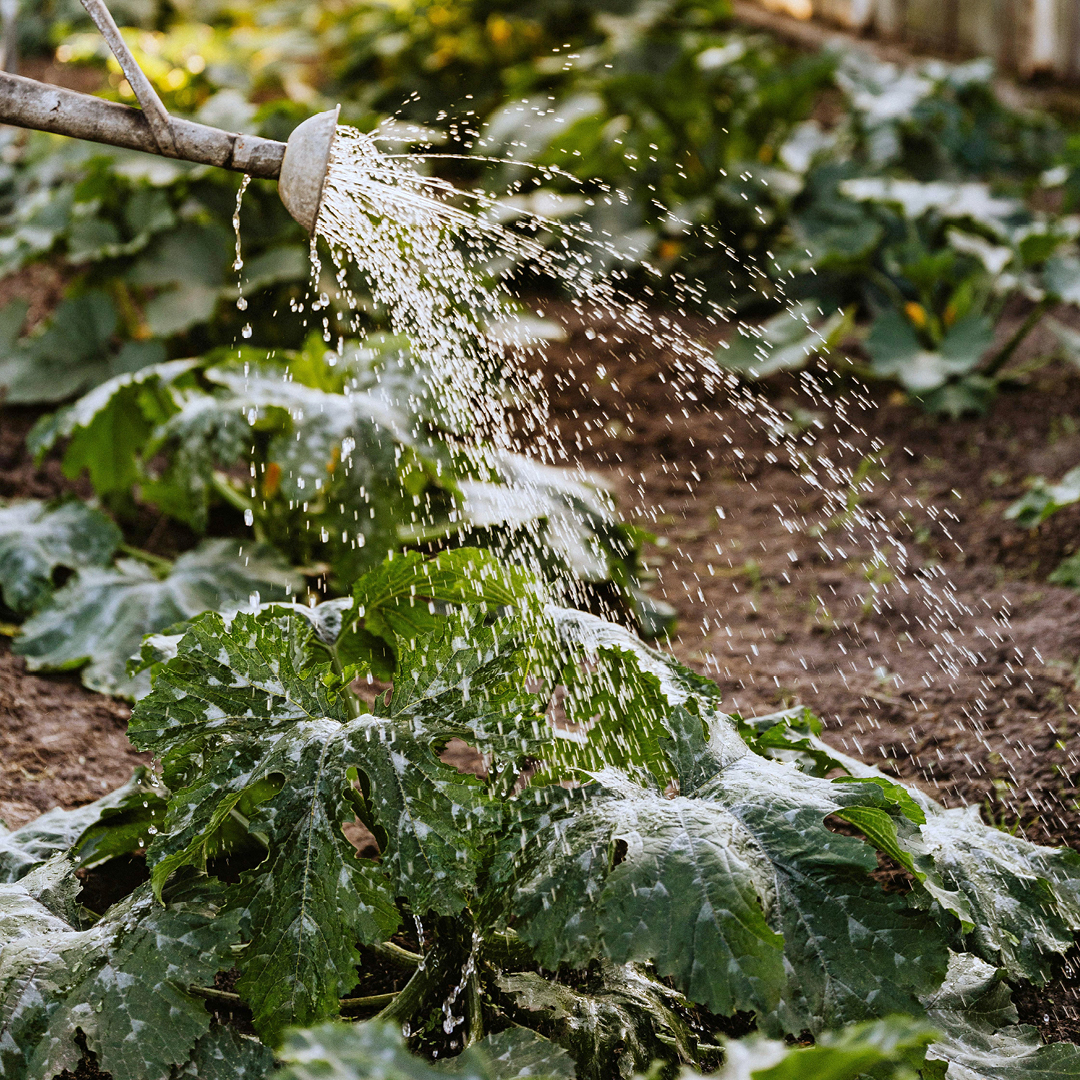
It happens every year around March. The days get a little longer, the birds start singing, and you get that undeniable itch to get out in the garden. But while your spirit is ready, the ground often isn’t.Early spring soil is tricky. It is cold, damp, and slow to warm up. If you plant heat-loving crops like tomatoes or peppers now, they will likely rot before they even sprout. However, you don’t have to wait until May to start growing food. Nature has provided us with an incredible lineup of vegetables that actually prefer the chill of March and April. By choosing the right crops and using a few smart techniques, you can have a lush, productive garden weeks before your neighbors.

Why Cold Soil Isn’t a Dealbreaker

For many seeds, cold soil is a “do not enter” sign. It slows down germination and prevents roots from taking up nutrients. But cool-season crops are different. These hardy plants are biologically programmed to wake up when soil temperatures are as low as 40–50°F. In fact, many of them taste sweeter and have a crisper texture when grown in the cool air of early spring rather than the heat of summer.

Top Picks for March and April Sowing

If you are ready to brave the brisk air, here are the best vegetables to direct sow right now:

  • Peas: There is nothing quite like the taste of a garden-fresh pea. These are the classic early spring crops. They are incredibly hardy and can go into the ground as soon as the soil can be worked in March. Give them a trellis to climb, and you will be snacking in no time.
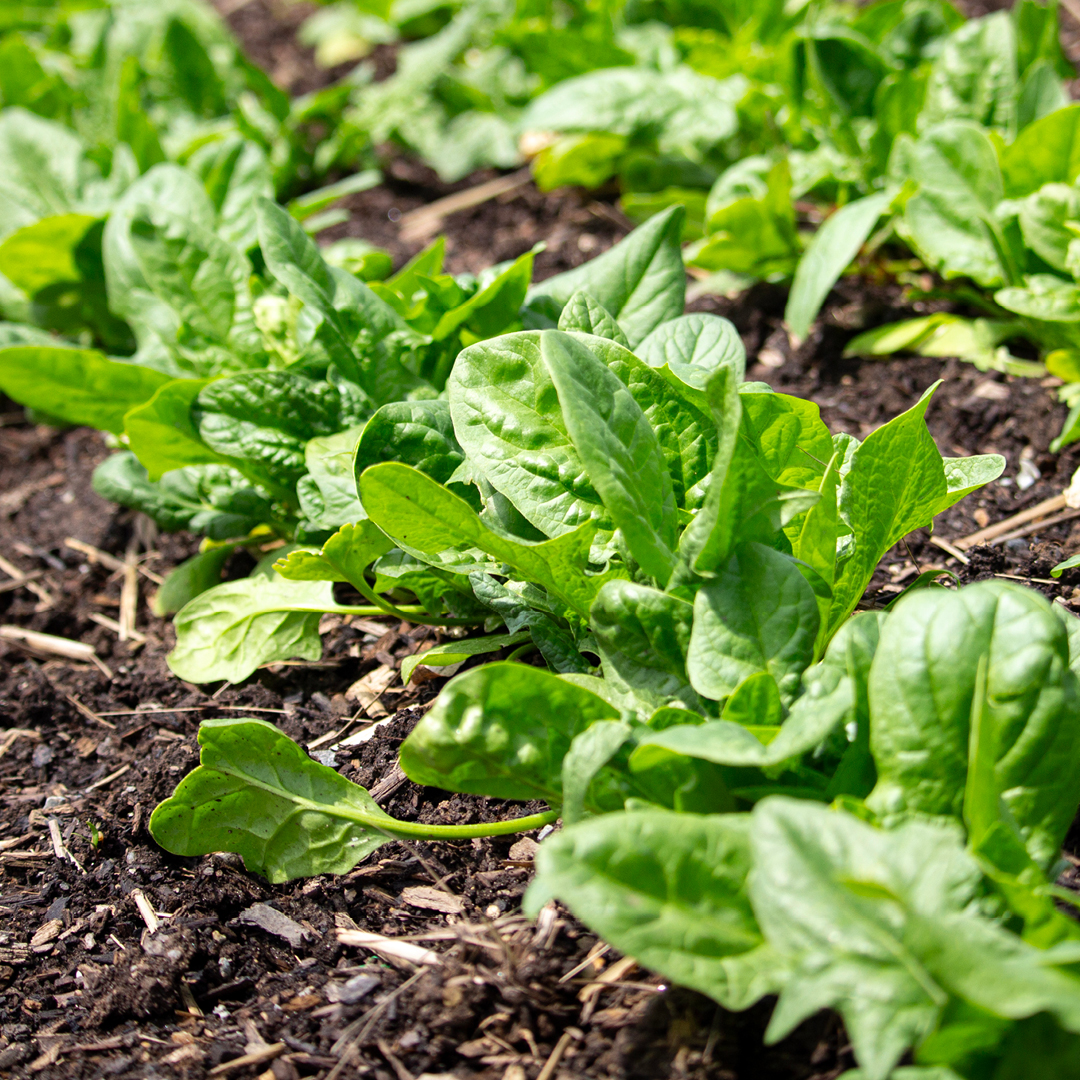
  • Spinach: This leafy green is a champion of the cold. It thrives in cool, moist soil and germinates quickly. Sow it in March for baby greens that are tender and sweet.
  • Radishes: If you want instant gratification, plant radishes. They are fast-growing and aren’t bothered by cold soil. You can often harvest them just a few weeks after planting in April.
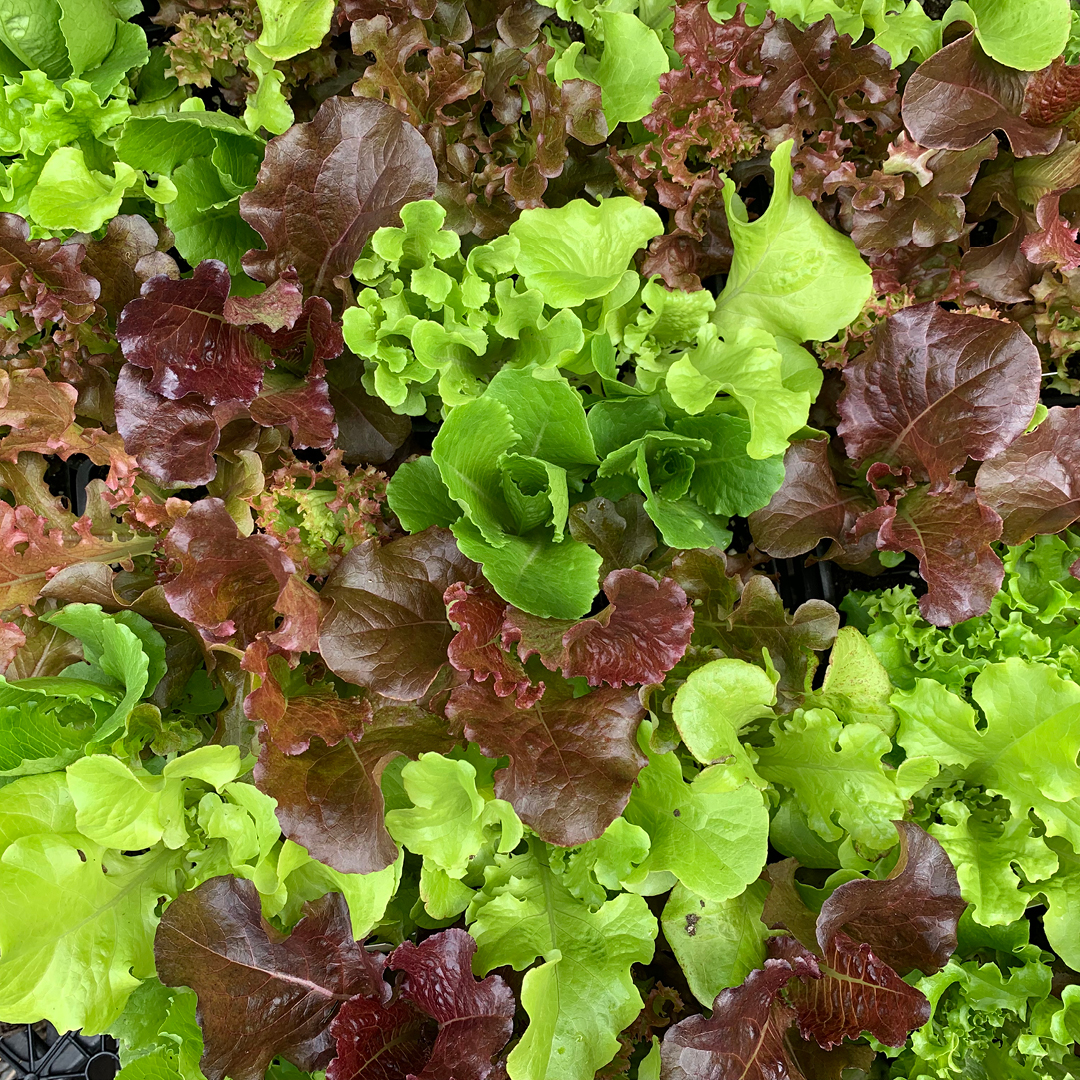
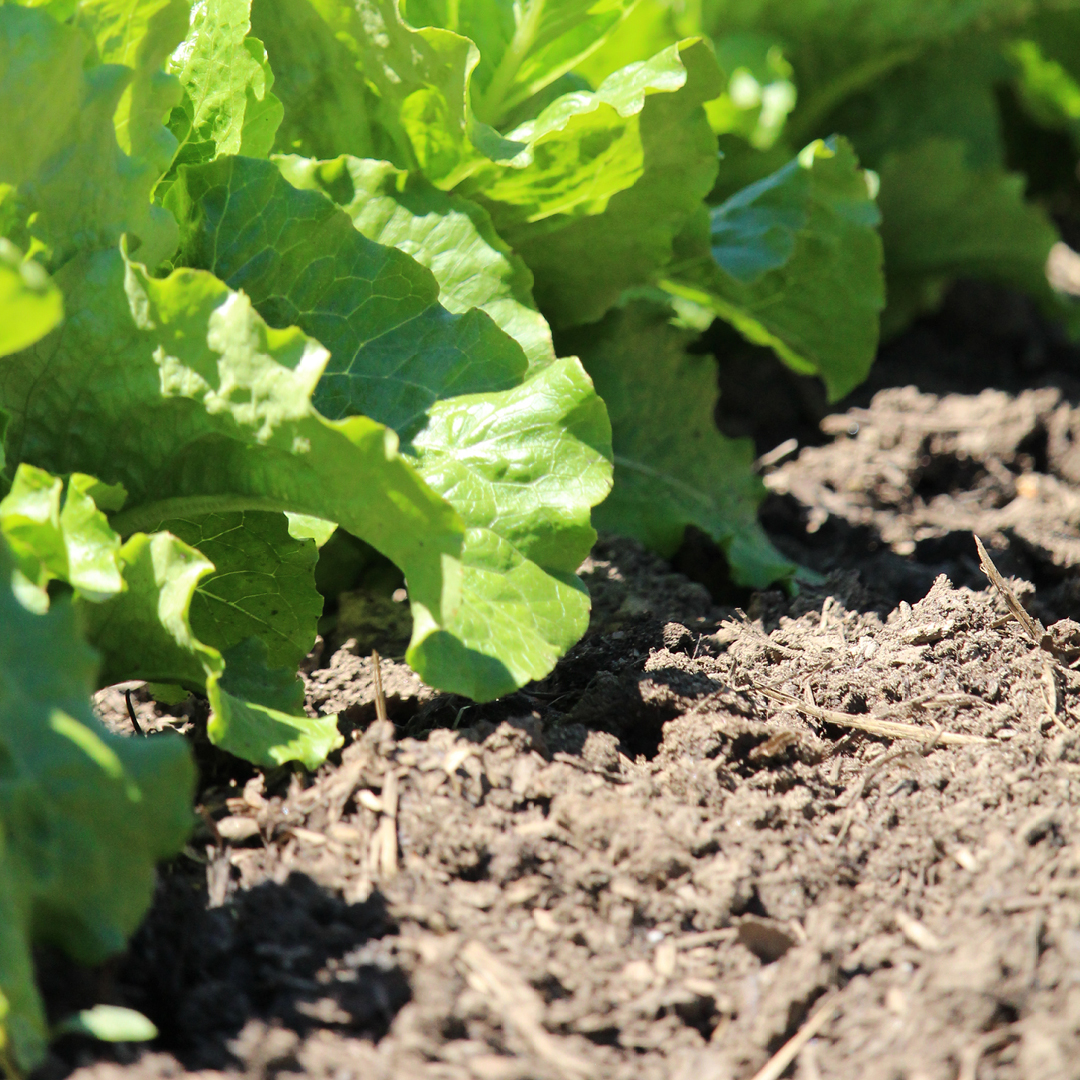
  • Lettuce: Cool soil is actually preferred for lettuce germination. Plant a mix of varieties for a beautiful and tasty salad bowl. Just be ready to harvest before the summer heat makes them bitter.
  • Carrots: While they can be a bit slow to wake up in cold soil (sometimes taking up to three weeks), early spring carrots are worth the wait. The cool temperatures concentrate sugars in the roots, making them incredibly sweet.
  • Beets: These earthy gems tolerate light frosts well. Sow them in April when the soil has warmed slightly to around 50°F. Don’t forget that you can eat the greens while you wait for the roots to bulb up!
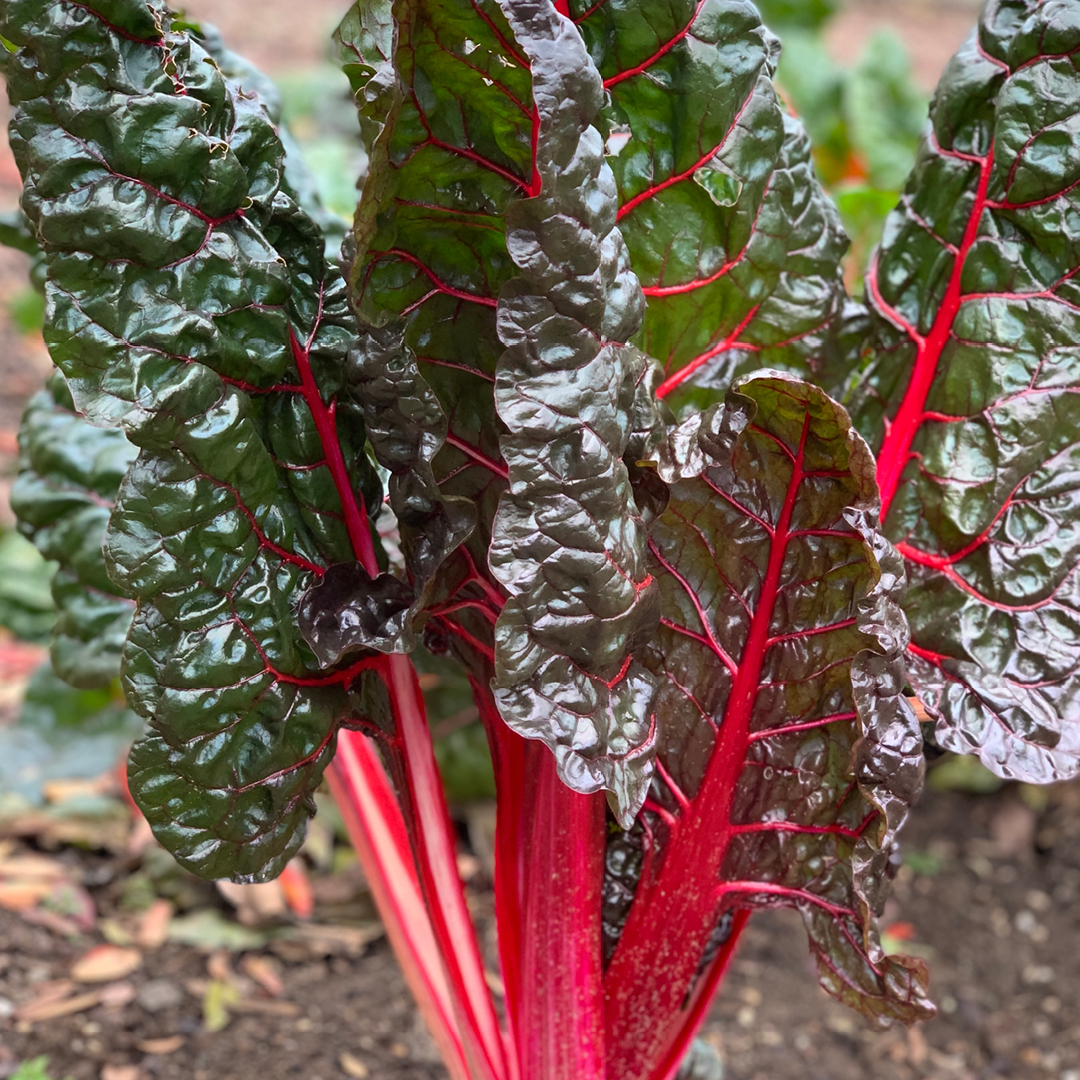
  • Kale and Chard: These are the workhorses of the vegetable garden. Both are extremely cold-tolerant. Chard might take a moment to get going, but once it establishes, it will provide harvests well into the warmer months.

Tips for Success in Chilly Weather

Gardening in March and April requires a slightly different approach than summer gardening. Here is how to ensure success:

  • Do the Squeeze Test: Before you dig, grab a handful of soil and squeeze it. If it drips water or forms a tight, sticky ball, it is too wet to work. Digging in wet, cold soil can ruin its structure. Wait until it crumbles loosely in your hand.
  • Boost the Heat: You can cheat a little by using row covers or cloches. These lightweight fabrics act like a mini-greenhouse, trapping heat near the soil surface and protecting tender seedlings from those surprise late frosts.
  • Don’t Bury Them Deep: In cold soil, seeds often do better when planted slightly shallower than usual, as the surface warms up faster during the day.
  • Keep it Coming: Don’t plant everything at once. Use succession planting by sowing a new row of lettuce or radishes every two weeks. This ensures you have a continuous harvest rather than one giant glut of vegetables.

Spring is a time of renewal, and there is no better way to celebrate than by coaxing life from the cold earth. So grab your seeds and get out there—your future salads are waiting!

cold soil vegetable planting

March Garden Momentum

March signals the true start of the growing season. As nature wakes up—buds swelling and daylight stretching—it’s the perfect time to set the stage for a thriving garden. Use this early spring checklist to help your landscape transition smoothly into the active months ahead.

Inspect and Tidy Garden Beds

Winter often shifts plants and leaves behind debris.

  • Remove Debris: Clear fallen branches and leftover leaves that may harbor pests.
  • Avoid Compaction: Steer clear of walking on thawing soil to prevent damaging its structure.

Prune Shrubs and Trees

Now is the ideal time to shape up your woody plants before new growth emerges.

  • Prune Now: Fruit trees, roses, and summer-blooming shrubs. Remove dead wood and cross-branching stems.
  • Wait to Prune: Spring bloomers like lilac, forsythia, and magnolia should only be pruned after they flower.

Divide Perennials

Enhance plant vigor by dividing overcrowded clumps as soon as growth appears.

  • Target Plants: Hostas, daylilies, ornamental grasses, and coneflowers benefit greatly from division now.

Prepare the Soil

Healthy soil is the foundation of a resilient garden.

  • Amend Soil: Once the ground is workable (not muddy), mix in compost or organic matter to boost nutrient content and moisture retention.

Start Seeds Indoors

Give cool-season crops a head start under grow lights.

  • Sow Now: Lettuce, kale, broccoli, snapdragons, and petunias. Always check your local frost date guidelines for timing.

Maintain Garden Tools

Sharp, clean tools prevent the spread of disease and make work easier.

  • Tool Care: Sharpen pruners, oil wooden handles, and disinfect cutting surfaces.

Apply Dormant Oil

Control overwintering pests before buds break.

  • Pest Management: Spray fruit trees and roses with dormant oil to manage aphids, mites, and scale. Ensure temperatures remain above freezing during application.

Refresh Mulch and Edges

Mulch moderates soil temperature and suppresses weeds.

  • Mulching: Fluff existing mulch or add fresh material, keeping it away from plant stems.
  • Edging: Redefine bed edges now for a polished look all season.

Plan Your Planting

Map out your garden expansions to support biodiversity.

  • Biodiversity: Incorporate native plants, herbs, and pollinator-friendly flowers to enhance habitat health.

Visit Becker’s

Stock up on essential supplies as spring progresses.

  • Shop Local: Find seeds, soil amendments, and early-blooming shrubs. Our staff is ready to help connect you with successful local growing practices.

Early spring preparation sets the rhythm for the year. With thoughtful planning, your garden will reward you with vibrant blooms and productive harvests in the months ahead.

early spring garden checklist

Planting Bare-Root Trees

Bare-root trees provide one of the best ways to establish strong, long-lived landscape trees. Because they are planted while dormant, they settle into the soil, form roots quickly, and often outperform container-grown trees after just a few seasons. Whether you’re planting flowering ornamentals, shade trees, evergreens, or fruit trees, technique and timing make all the difference.

Bare-root trees are available only during a short seasonal window—late winter through early spring—before the growing season begins. Planting during this period helps reduce transplant shock and improves long-term health and stability.

Why Bare-Root Trees Excel

Without potting soil or container restrictions, bare-root trees have natural, uncirculated root systems capable of adapting immediately to native soil. This leads to improved anchoring, better nutrient uptake, and stronger drought resilience over time.

They are lighter, easier to move, and often cost less—making them ideal for both home gardeners and large landscape installations.

Preparing the Tree Before Planting

  • Keep roots moist but not submerged until planting.
  • Store in a cool, shaded location—never allow roots to freeze or dry out.
  • Soak roots in water for one to two hours before planting to rehydrate.

If planting must be delayed more than a few days, temporarily “heel in” the roots with soil or mulch.

Knowledge Tip: Tree Size Matters

  • Smaller bare-root trees (typically 2–4 years old, 0.5–1″ trunk diameter) are easier to establish and adapt quickly to their new environment. They require less initial water and support and tend to recover from transplant shock faster.
  • Larger bare-root trees (2″ diameter or more, occasionally offered) can be planted bare-root, but they are more challenging to establish because the root system must support a larger canopy. Extra attention to watering, staking (if needed), and mulching is critical for their success.
  • Fruit trees are commonly sold bare-root with trunks as small as 0.75″ as young stock. These young trees establish readily, while larger specimens require careful handling to ensure the graft union remains above soil and roots are fully supported.

How to Plant Bare-Root Trees

Follow this order for the best success:

  1. Dig the planting hole.
    Make it two to three times wider than the roots, but only deep enough so the tree will sit at the correct finished height.
  2. Locate the graft union (if present).
    Most fruit and ornamental trees are grafted. The graft union appears as a subtle bulge, bend, or seam low on the trunk.
    This point must remain above soil level—typically 2–3 inches above final grade.
    Planting too deep can cause improper rooting from the scion and reduce hardiness, stability, and performance.
  3. Create a soil mound in the center of the hole.
    Spread the roots outward over the mound so they sit naturally—not bent or circling.
  4. Backfill with the soil you removed.
    Avoid adding potting mix or rich compost during planting, as this can discourage roots from spreading into the surrounding soil.
  5. Water deeply as you fill.
    This helps settle soil around the roots and eliminates air pockets.
  6. Mulch properly.
    Apply 2–3 inches of mulch around the tree, keeping a small mulch-free gap right around the trunk.
  7. Stake only if necessary.
    Trees develop stronger trunks when allowed to sway slightly in the wind. Larger bare-root specimens are more likely to require temporary staking until roots establish.

Should You Fertilize at Planting?

Avoid traditional high-nitrogen fertilizer during planting. Early fertilizer can encourage premature leaf growth before the root system is ready to support it.

Instead, consider:

  • Mycorrhizal root inoculants to increase nutrient and moisture uptake.
  • Root stimulators containing humic acids, kelp extract, or B vitamins.

Regular fertilizing can begin the following growing season, once new foliage appears and the tree shows signs of establishment.

After-Planting Care

For the first one to two years, deep, consistent watering is the most important maintenance step. Water slowly and deeply once or twice per week, depending on rainfall and soil drainage.

Avoid major structural pruning at planting unless removing broken or crossing branches. Formative pruning can begin after the tree is established.

Types of Bare-Root Trees and How They Behave

Flowering Trees – Dogwood, crabapple, redbud, and flowering cherry adapt beautifully in bare-root form. Their fine root systems establish quickly, helping them develop healthier branching and better bloom displays long-term.

Shade Trees – Maple, oak, hackberry, linden, and elm often grow faster and straighter when planted bare-root. Early pruning for a strong central leader helps them mature into stable, structurally sound shade trees.

Evergreen Trees – Spruce, fir, and some pine species can be planted bare-root with success if roots remain moist and transplanting occurs early enough in the season to prevent moisture loss through their foliage.

Fruit Trees – Apple, pear, peach, plum, and cherry respond exceptionally well when planted bare-root. Because most are grafted, correct graft height is especially crucial for longevity and productivity. Young trees with trunks around 0.75″ diameter are easier to establish, while larger bare-root fruit trees require careful handling and attentive care.

Bare-root trees offer an economical, lightweight, and highly effective option for early-season tree planting. With careful planting depth, graft union awareness, attention to tree size, proper root care, and consistent watering, these trees quickly develop into some of the healthiest and most resilient specimens in the landscape.

If you’re choosing varieties or gathering supplies, the team at Becker’s an help ensure you get the right tree, amendments, and tools for long-term success.

planting bare-root trees

Spotting Early Spring Natives

Spring is a magical time in the garden, signaling renewal and the emergence of native plants that have weathered the winter dormancy. Recognizing these early bloomers and foliage can help gardeners plan for succession planting, provide early food for pollinators, and ensure a cohesive, thriving landscape. Understanding their characteristics and growth habits is key to identifying and nurturing them successfully.

Understanding Native Plant Emergence

Native plants have evolved to respond to local seasonal cues such as temperature, soil moisture, and day length. In early spring, many perennials, shrubs, and trees break dormancy with subtle signals—tiny shoots, swollen buds, or early flowers. Recognizing these cues allows gardeners to provide appropriate care, such as early mulching, protective watering, or frost precautions.

Key Identification Tips

  1. Bud Characteristics: Look for swollen, often brightly colored or fuzzy buds on trees and shrubs. Species such as witch hazel, spicebush, and redbud exhibit distinct early swelling before leaf emergence.
  2. Ground-Level Shoots: Early-emerging perennials like bloodroot, trillium, and Virginia bluebells send up basal shoots that can be distinguished from weeds by their smooth, often glossy texture.
  3. Flowering Before Leafing: Some natives bloom before their foliage fully develops. Hepatica, bloodroot, and spring beauties are prime examples, providing nectar for early pollinators.
  4. Leaf Shape and Texture: Young leaves often have unique shapes or colors. For example, mayapple emerges with umbrella-shaped leaves, while jack-in-the-pulpit produces a distinctive hooded foliage. Observing these traits can confirm species identity before flowering occurs.
  5. Soil and Microclimate Clues: Many early natives prefer specific conditions. Moist woodland areas may host trillium and wild ginger, while drier, well-drained slopes encourage wild columbine and native geraniums.

Observing Growth Patterns

Native plants often emerge in a predictable sequence, from the earliest ephemerals to later perennials. Maintaining a garden journal or photographing early growth can help track which species emerge first, assisting with future landscape planning and providing insight into seasonal variations.

Encouraging Early Growth

While native plants are adapted to local conditions, gardeners can support healthy early emergence by:

  • Applying a thin layer of mulch in late winter to moderate soil temperature.
  • Ensuring adequate moisture without waterlogging.
  • Avoiding early fertilization that may stimulate excessive tender growth susceptible to frost damage.

Benefits of Recognizing Early Natives

Identifying early-emerging native plants provides multiple advantages. These plants often:

  • Supply essential nectar and pollen for emerging pollinators.
  • Establish a foundation for layered plantings that provide continuous interest throughout the season.
  • Serve as indicators of soil health and microclimate suitability for other plantings.

By paying attention to subtle cues and familiarizing yourself with native species’ early growth traits, you can foster a thriving, biodiverse garden that supports wildlife and celebrates seasonal change.

Becker’s encourages gardeners to take a closer look each spring and discover the first signs of life that herald the season ahead.

early spring natives

Woodland Edge Garden Ideas

Creating a native woodland edge garden is a rewarding way to add beauty, biodiversity, and year-round interest to your landscape. Woodland edge gardens mimic the transitional zone between forest and open areas, providing unique habitat for pollinators, birds, and small wildlife while offering gardeners a naturally layered and dynamic planting scheme. By selecting native species suited to local soil and light conditions, you can cultivate a low-maintenance garden that thrives with minimal intervention.

Understanding the Woodland Edge

A woodland edge is defined by the gradual transition from shaded forest understory to sunny meadow or lawn. This zone often experiences dappled sunlight, partial shade, and moderate moisture, making it ideal for a mix of trees, shrubs, and perennials. Native plants in this zone are adapted to these light and soil conditions, and their layered growth habits—tall trees, medium-size shrubs, and low-growing groundcovers—create a visually appealing, ecologically functional environment.

Choosing the Right Trees

Trees form the backbone of a woodland edge garden, providing structure, shade, and seasonal interest. Consider these native options:

  • Eastern Redbud (Cercis canadensis): Early spring blossoms, moderate size, and adaptable to partial shade.
  • Serviceberry (Amelanchier spp.): Multi-season appeal with spring flowers, edible summer berries, and stunning fall foliage.
  • Sugar Maple (Acer saccharum): Provides a rich canopy for shade-loving understory plants and brilliant autumn color.

Planting a mix of trees that vary in bloom time, height, and texture will create visual depth and year-round interest while supporting wildlife diversity.

Selecting Shrubs for Layered Interest

Shrubs add mid-layer structure, attract pollinators, and provide food for birds. Excellent native choices include:

  • Ninebark (Physocarpus opulifolius): Multi-stemmed shrub with peeling bark, spring blooms, and summer seed heads.
  • Winterberry (Ilex verticillata): Deciduous holly with bright red berries that persist through winter.
  • Spicebush (Lindera benzoin): Fragrant leaves when crushed, yellow spring flowers, and berries that attract birds.

Shrubs planted in clusters or drifts help create a naturalistic edge, softening the transition between trees and lower-growing plants.

Groundcovers and Perennials

Low-growing native plants fill the understory, suppress weeds, and provide early-season blooms for pollinators. Consider these:

  • Wild Ginger (Asarum canadense): Dense, spreading mat that thrives in shade and helps control erosion.
  • Foamflower (Tiarella cordifolia): Attractive spring blooms and spreads to form a lush groundcover.
  • Creeping Phlox (Phlox subulata): Sun-tolerant option that adds vibrant color along edges.
  • Solomon’s Seal (Polygonatum biflorum): Graceful arching stems with dangling white flowers in spring.

Layering these perennials and groundcovers beneath trees and shrubs provides visual interest, stabilizes soil, and supports a healthy ecosystem.

Tips for a Successful Woodland Edge Garden

  1. Mimic Natural Layers: Plant tall trees first, followed by medium-size shrubs and low-growing perennials and groundcovers.
  2. Consider Soil Moisture: Woodland edges often have variable drainage; amend soil as needed with compost for healthy root establishment.
  3. Plant in Drifts: Group plants in clusters rather than straight lines for a naturalized appearance.
  4. Encourage Wildlife: Include berry-bearing shrubs and nectar-rich perennials to attract birds, pollinators, and beneficial insects.
  5. Maintain with Minimal Intervention: Remove invasive species promptly, mulch lightly with shredded leaves, and water only during extended dry periods.

Seasonal Highlights

  • Spring: Blooming trees, early perennials, and emerging groundcovers provide color and nectar for pollinators.
  • Summer: Lush foliage shades understory plants while offering shelter for wildlife.
  • Fall: Vibrant foliage and berries create visual interest and provide food sources for birds.
  • Winter: Structural beauty of tree bark, shrub stems, and persistent berries adds texture to the landscape.

Start Your Woodland Edge Garden with Becker’s Farm

A native woodland edge garden is a sustainable and beautiful way to integrate ecological function into your property. With careful selection of trees, shrubs, and perennials, you can enjoy year-round interest while supporting pollinators, birds, and beneficial insects. At Becker’s Farm we provide a curated selection of native plants and expert advice to help you design a woodland edge that is both visually stunning and environmentally supportive.

woodland edge garden ideas

woodland edge garden ideas

woodland edge garden ideas

Insect-Repellent Container Gardens

Summer is all about outdoor gatherings, but irritating insects can dampen the fun. Creating an insect-repellent container garden is a simple, effective, and attractive way to keep bugs at bay while keeping you and your guests comfortable.

Abundant Annoyers

Any celebratory summer soiree can become a proverbial nightmare, sending attendees scattering when unwanted guests appear. The most abundant agitating and annoying insects of outdoor get-togethers are:

  • Ants
  • Flies
  • Gnats
  • Mosquitoes
  • Ticks
  • Wasps

The good news is that numerous attractive plants can be combined in planters around entertainment areas to repel these party wreckers.

Repellent Plants

The insect-repellent plants included in this list may be grown as summer annuals, in containers, in just about any area of the United States:

  • Basil (Ocimum basilicum)
    Repels mosquitoes, flies, and wasps
  • Catnip (Nepeta cataria)
    Repels mosquitoes, flies, and gnats
  • Citronella (Cymbopogon nardus)
    Repels mosquitoes, flies, and wasps
  • Eucalyptus (Eucalyptus spp.)
    Repels wasps
  • Lavender (Lavandula angustifolia)
    Repels mosquitoes, flies, and gnats
  • Lemon Balm (Melissa officinalis)
    Repels mosquitoes, flies, and gnats
  • Lemongrass (Cymbopogon citratus)
    Repels mosquitoes, flies, ticks, and wasps
  • Marigold (Tagetes spp.)
    Repels mosquitoes, flies, and gnats
  • Mint (Mentha spp.)
    Repels mosquitoes, ants, and flies
  • Pennyroyal (Mentha pulegium)
    Repels wasps
  • Petunias (Petunia spp.)
    Repels gnats
  • Rosemary (Salvia rosmarinus)
    Repels mosquitoes, flies, and ticks
  • Spearmint (Mentha spicata)
    Repels wasps
  • Wormwood (Artemisia absinthium)
    Repels wasps and flies

Container Placement

Placement is an important consideration—position pots of plants where they will be most effective in keeping bugs at bay. Combining different insect-repellent plants in the same container is a good idea for a more effective and visually appealing arrangement. Areas to consider:

  • Patio and Deck Borders: Place containers along the edges of your patio or deck to create a natural barrier against insects. This will help keep the bugs at bay while you and your guests enjoy the open space.
  • Dining Areas: Position containers around your outdoor dining area. Lavender, basil, and mint are excellent choices as they not only repel insects but also add a delightful fragrance to your dining experience.
  • Entryways: Place pots of insect-repellent plants near entryways to your home and outdoor entertaining spaces. This helps prevent insects from following you and your guests inside.
  • Seating Areas: Arrange containers around seating areas where guests are likely to gather. Plants like citronella, lemon balm, and rosemary are perfect for these spots, as their scents are particularly effective at keeping bugs away.
  • Table Centerpieces: Use small pots of insect-repellent plants as table centerpieces. Not only do they look charming, but they also create a bug-free zone right where your guests are eating and drinking.
  • Hanging Baskets: Utilize hanging baskets filled with trailing insect-repellent plants like mint and petunias. These can be hung above seating areas to provide additional protection from flying insects.

Give these insect-repellent plants a try this summer. Strategically place planters to create beautiful, functional container gardens that will enhance your summer entertaining experience. Enjoy your gatherings without the nuisance of bugs, and delight in the added beauty and fragrance these plants offer.

Insect Repellent Container Garden

Veggie Garden Tips for a Care-Free Vacation

Summer is the perfect time for vacations, but for gardeners, it can be a stressful period. Leaving your precious veggie garden unattended can lead to wilting plants, pest invasions, and missed harvests. Fear not! With some preparation, you can enjoy your vacation while ensuring your vegetable garden thrives in your absence. Here’s how:

Watering Solutions

Self-Watering Systems: Invest in a self-watering system, such as drip irrigation or soaker hoses connected to a timer. These systems deliver water directly to the roots, reducing evaporation and ensuring consistent moisture.

Mulching: Apply a thick layer of mulch around your plants before you travel. Mulch helps retain soil moisture, keeps roots cool, and reduces the need for frequent watering. Straw, wood chips, and compost are excellent mulch options.

Watering Globes and Spikes: These devices slowly release water into the soil over time. Fill them before you leave, and they’ll provide a steady water supply for your plants.

Pest Control

Preventive Measures: Before leaving, inspect your garden for any signs of pests and treat accordingly. Use organic pest control methods like neem oil, insecticidal soap, or diatomaceous earth to keep pests at bay.

Beneficial Insects: Introduce helpful insects like ladybugs, lacewings, and parasitic wasps to your garden. These natural predators help control pest populations.

Weed Management

Mulching: Besides conserving moisture, mulch also suppresses weed growth. A thick layer of mulch can prevent weeds from sprouting and competing with your vegetables for nutrients.

Weed Barrier Fabric: Lay down weed barrier fabric in between rows of plants. This fabric allows water to pass through while blocking sunlight, preventing weed growth.

Harvest Timing

Staggered Planting: Plan your planting schedule so that crops mature before or after your vacation. This way, you can avoid missing critical harvest windows.

Prune and Thin: Remove any overgrown or excess foliage to improve air circulation and reduce the likelihood of disease. Thinning crowded plants ensures they have enough space to grow and reduces competition for resources.

Neighborly Help

Garden Sitters: Enlist the help of a trusted friend or neighbor to check on your garden while you’re away. Provide clear instructions on watering, harvesting, and any specific care your garden needs.

Garden Exchange: Offer to take care of their garden when they go on vacation in exchange for their help with yours. This mutual arrangement ensures both gardens receive the attention they need.

Tech Solutions

Smart Garden Devices: Invest in smart garden devices like soil moisture sensors, smart sprinklers, and remote cameras. These gadgets allow you to monitor and control your garden from your smartphone, providing peace of mind while you’re away.

Preparation Checklist

  • Arrange a garden sitter well in advance.
  • Ensure automated watering systems and technical gadgets are all working.
  • Prune or support tall plants to prevent wind damage.
  • Secure all garden structures to withstand storms or heavy winds.
  • Fertilize to guarantee that your plants have vital nutrients while away.
  • Mulch to retain soil moisture and keep weeds at bay.
  • Harvest ripe vegetables to prevent them from rotting on the vine.
  • Provide your garden sitter with clear instructions.
  • Water right before you leave.
  • Check weather forecasts and plan accordingly.

These steps allow you to vacation-proof your vegetable garden and enjoy your time away without worrying about your plants. With a little planning and some help from technology and friends, your garden will be in great shape when you return.

Veggie Garden Tips
Veggie Garden Tips
Veggie Garden Tips

Cool Off with Caladium

Caladiums are phenomenal ornamental foliage plants, native to South America and now widely enjoyed in gardens all over the world. Gorgeous in cool, shady spaces, caladiums can make a beautiful impact in darker areas of the garden where it is a challenge to introduce color.

Discovering Caladiums

Also called angel wings or elephant ears, these plants are bold ornamentals with huge, dramatic leaves that are either lance-like, arrow, or heart-shaped. While some caladiums can grow as much as 24 inches high and wide, smaller dwarf cultivars are also available to plant in tiny gardens and containers. All caladiums possess stunningly beautiful, boldly patterned leaves in a mix of colors and hues, including green, white, pink, red, and cream. They often display flamboyant veining, spots, or flecks on the leaves making them even more breathtaking.

Caring for Caladiums

These plants grow from tubers and are easy for gardeners of all experience levels to cultivate. Caladiums are ideal in shady borders or around the trunks of trees, they can be perfect groundcovers in darker garden spots, they are an awesome filler for difficult spaces, and are even stunning in containers and pots. To prevent damage to their foliage, it is best to position caladium in a sheltered area out of strong winds. Caladium tubers can be purchased bare or already potted. Here are some tips to grow the most healthy and luscious caladiums:

  • Choose large, firm tubers for the most vigorous plants with spectacular foliage. Smaller tubers will still grow, but the plant they produce will also be proportionally smaller.
  • Plant caladium tubers in late spring when the soil temperature reaches 65 degrees. A soil thermometer can help ensure that the time is right for planting. You may also get a jumpstart on the season by planting caladium indoors, in pots, about 5 weeks before the anticipated last frost for your area. Simply transplant outdoors when soil temperatures are correct.
  • Position caladiums in moist, well-drained garden soil that is rich in organic matter to nourish strong, healthy, vibrant plants.
  • Plant the tubers in partial to full shade. These plants generally prefer cooler spots but can tolerate a little more sunlight in naturally cooler regions.
  • Plant caladiums 4-6 inches apart and 4-6 inches deep. Smaller tubers may be planted closer together, while larger ones should be spaced further apart.
  • Add a light layer of mulch over planted caladiums to moderate soil temperature, conserve soil moisture, and prevent weeds. Organic mulch will work best and will also continue nourishing these plants.
  • Feed caladiums every 4 to 6 weeks during the growing season. Use a balanced liquid feed poured around the base of the plant or a slow-release fertilizer at time of planting. Adding compost or other amendments to the soil before planting will also assist in nourishment.
  • Water caladium plants well and keep them consistently moist so that they remain beautiful, lush, and healthy during the entire growing season. A drip system or soaker hose will make watering a cinch!

Overwintering Caladiums

Caladiums are “tender” bulbs, meaning that they cannot overwinter in the ground where the soil typically freezes. When the summer ends and temperatures begin to cool, it’s time to dig up and store them for the winter. Once the foliage turns yellow and wilts, the tubers may then be carefully lifted from the ground. They should be placed in a warm, dry location for 10-14 days, during which time the foliage will continue to dry out. The leaves can then be clipped off – use clean, sharp clippers to be sure no fungus or infections are introduced – and place the tubers in a cardboard box or paper bag. Do not use a plastic bag, which will prevent air circulation necessary to keep tubers from rotting during storage and thus rendering them useless for future enjoyment. Cover stored tubers lightly with dry peat moss and store them in a cool (around 50 degrees), dry, dark location, until next spring, when they’ll be healthy and ready to plant again for more incredible foliage.

Caladiums are eye-catching in cool shade gardens. Their bold, colorful leaves and their wide selection of cultivars will add color, brightness, and uniqueness to the shady garden, landscape, front porch, and backyard entertainment space. Consider adding a little drama to your yard this summer.


Buddleia: Our Beloved Butterfly Bush or Not?

Buddleia, commonly known as the butterfly bush, is a flowering shrub that has won the hearts of many a gardener and pollinator lover for a very long time. Buddleia davidii, the most commonly grown species of butterfly bush, is renowned for its vibrant summer blooms, ease of care, and ability to attract butterflies. While butterfly bush is beloved for these reasons, B. davidii has a dirty little secret: it is invasive! Its ability to self-seed prolifically allows it to spread rapidly, sometimes outcompeting native vegetation. To mitigate this, gardeners are encouraged to plant sterile cultivars that do not produce viable seeds.

The Lo & Behold® and Miss Series of Sterile Butterfly Bushes

Overview of Sterile Series

The Lo & Behold® and Miss Series are notable for offering sterile varieties of Buddleia davidii, addressing concerns about the invasive nature of the species. These two series provide gardeners with beautiful, non-invasive options that maintain the ornamental and pollinator-attracting qualities of traditional butterfly bushes.

Lo & Behold Series
The Lo & Behold series offers a range of dwarf butterfly bushes that are sterile, meaning they don’t produce seeds and thus won’t spread invasively. Despite their sterility, they are still highly attractive to pollinators, especially butterflies and bees, and bloom continuously throughout the summer months.

Varieties:

  1. Lo & Behold ‘Blue Chip’
    • Color:Blue-purple
    • Size:5-2.5 feet tall and wide
  2. Lo & Behold ‘Blue Chip Jr.’
    • Color:Lavender blue
    • Size:5-2 feet tall and wide
  3. Lo & Behold ‘Ice Chip’
    • Color:White
    • Size:1-2 feet tall and wide
  4. Lo & Behold ‘Lilac Chip’
    • Color:Lavender-pink
    • Size:5-2 feet tall and wide
  5. Lo & Behold ‘Pink Micro Chip’
    • Color:Pink
    • Size:1-2 feet tall and wide
  6. Lo & Behold ‘Purple Haze’
    • Color:Deep purple
    • Size:2-3 feet tall and wide

Miss Series

The Miss series also features sterile butterfly bushes in a more standard size. It offers a larger shrub with beautiful blooms that attract a range of pollinators, including butterflies, bees, and even hummingbirds.

Varieties:

  1. Miss Molly
    • Color:Rich magenta
    • Size:4-5 feet tall and wide
  2. Miss Pearl
    • Color:Pure white
    • Size:4-5 feet tall and wide
  3. Miss Ruby
    • Color:Vivid ruby red
    • Size:4-5 feet tall and wide

Attractiveness to Pollinators

Both series are designed to maintain the key feature that makes Buddleia davidii so popular: their appeal to pollinators. The dense clusters of flowers are particularly attractive to butterflies, which are drawn to the nectar. Bees also frequently visit these plants, making them a great addition to a pollinator-friendly garden. Hummingbirds have been known to visit the larger varieties in the Miss series, especially those with bright, vibrant colors like Miss Molly and Miss Ruby.

YOUR GARDEN CENTER continues to provide you with up-to-date plant information as well as an incredible selection of plants to satisfy the most eco-conscious gardener.


Hybrid Lilies

Hybrid Lilies are a stunning and fragrant addition to the garden that can liven up outdoor spaces with their unique blooms and vibrant colors. These plants thrive in most climates, making them the perfect choice for beginner gardeners or those looking for low-maintenance options. Lilies bloom in the late spring and summer, providing dramatic color and texture to the garden. They also make a beautiful home décor addition when used as cut flowers in arrangements or displayed independently. Growing hybrid lilies is a gratifying activity that gardeners can enjoy at any level of experience!

Types

There are many different types of hybrid lilies to select from. Each has its own unique feature and is available in a variety of colors. The most popular hybrid lily varieties include:

Oriental lilies

Asiatic lilies

Trumpet lilies

Site

The best soil for planting hybrid lilies is a rich and well-drained mixture that can hold moisture without becoming waterlogged. A soil pH of 6.5-7.0 is ideal. Lilies require regular watering throughout the growing season to keep their roots moist but not overly saturated. They should be given about an inch of water weekly. Regarding light requirements, lilies do best in full sun locations with at least 8 hours of direct sunlight per day during their peak bloom time. However, lilies can also tolerate some partial shade as long as they receive at least 4 hours of direct sunlight daily.

Plant

Planting hybrid lilies in your garden or container is as easy as dig, drop, and done! The best time to plant is in early spring when the ground is still cool and moist. Dig a planting hole 8 inches deep and space lilies about 8 inches apart. At this time, add a granular, high-phosphorus fertilizer to the soil to give the plants a good start with a robust root system. Place the lily bulb into the hole, so its pointed end faces up. Backfill the planting hole with soil, gently pressing it down around the bulb, and then water it thoroughly to eliminate air pockets. The ground may be mulched for extra protection from weeds, to moderate soil temperature, and assist with soil moisture retention. Now it’s time to sit back and watch your lilies grow!

Care

Caring for lilies throughout the growing season is essential to ensure that they bloom to their very best. Hybrid lilies should be fertilized with a high phosphorus fertilizer each spring. It is important to follow the instructions on the package regarding the application rate. They should also be groomed as needed to keep the garden looking tidy. This includes removing any spent flowers. Although relatively carefree, lilies may still be affected by certain pests and diseases, so checking plants regularly and treating them accordingly is a good idea.

Cut Flowers

Due to their showy, colorful blooms and long-lasting nature, hybrid lilies are highly sought after in floral arrangements. The flowers are exceptionally large, with some varieties producing blooms over 8 inches in diameter. Hybrid lilies come in a variety of colors, including white, pink, red, purple, yellow, orange, and even black. Many are fragrant – making them a great addition to any bouquet or flower arrangement. Hybrid lilies also last longer than most other cut flowers; their stems are strong enough to hold their blooms for up to two weeks when properly cared for.

With lilies, you can easily bring beauty and joy to your surroundings. Whether in the garden or as part of a creative arrangement, lilies have so much potential for any gardener looking to make their space stunning. By following our tips on planting, growing, and caring for lilies, you will ensure that these beautiful blooms reach their full potential and thrive year after year with colorful blossoms that will transform any living area into a place of serenity and wonder. So, get out there today and plant those lilies!

What Is the Difference Between an Annual, a Perennial, and a Biennial?

All living creatures, including plants and flowers, have expected lifespans. Recognizing the differences between annuals, perennials, and biennials can help you determine the life expectancies of different garden center plants so you can choose the varieties that will work best in your garden, landscape, and containers.

Annuals

Annual plants are fairly straightforward. These plants complete their entire lifespan in just one year or growing season, from first sprouting from seeds and growing foliage, stems, and blooms to creating seeds to continue the next generation. After the plants die, they will not regrow from their initial roots, but must restart from seeds again as completely new plants. Annuals are generally faster growing and have longer bloom seasons, making them colorful showstoppers in the garden and landscape.

Common and popular annuals include…

  • Begonias
  • Cosmos
  • Impatiens
  • Marigolds
  • Petunias
  • Zinnias

In addition to many popular flowers, most garden vegetables are also grown as annuals, though some of them would botanically be classified as perennials if they were allowed to remain in place for multiple years.

Perennials

Perennial plants are those with a lifespan that lasts at least three years, though they can live significantly longer as well. Perennial foliage may die back during the winter months but will regrow from dormant roots the next season. These plants often take longer to mature and may have shorter blossom times than annuals, but they can provide many years of beauty in the landscape.

Familiar perennials include…

  • Coneflowers
  • Coral bells
  • Daylilies
  • Peonies
  • Phlox
  • Sedum

In addition to these elegant and popular flowers, hedges and trees are also perennials. These plants are staples in the yard and provide a foundation for any landscape.

Biennials

Biennials fall between annuals and perennials with a two-year life cycle. During their first year, these plants establish leaves, roots, and stems. Though they may die back slightly over the winter, they will rejuvenate in the spring and grow flowers in their second year, maturing to seeds before the plants die completely.

Familiar biennial flowers include…

  • Canterbury bells
  • Columbine
  • Dame’s rocket
  • Forget-me-nots
  • Foxglove
  • Hollyhocks

Because these plants do not bloom in their first year, patience is essential to enjoy their beauty in their second year. Planting biennials in two successive years can ensure the plants enhance the landscape in multiple years.

Choosing Annuals, Perennials, and Biennials for Your Yard

Once you understand plant lifespans, you can more easily choose the plants that will give you a landscape you love. When choosing plants, larger perennials can create a stunning foundation or border for your yard, including showstopping specimen plants and shade trees. Smaller perennials can fill in larger spaces in flowerbeds and edging, while annuals add brilliant color to pathways, edges, and very visible spaces, including porch pots and containers.

Biennials can be spectacular transition plants, particularly if you may plan on expanding your landscaping beds in the future, or want to fill in a space temporarily before adding a new deck, porch, or otherwise expanding your home or outdoor living space. Biennials are also great choices if you want to enjoy a changing landscape without as much work each year, because you can enjoy the plants for two years before they need replacing. Many biennials are self-seeding making them great additions to the cottage garden.

Ultimately, a landscape that includes a thoughtful mix of annuals, perennials, and biennials will showcase different colors, textures, and growth patterns for stunning visual interest. New cultivars are developed every year, and greenhouses often have the latest plants and newest showstoppers on display. If you plan a mixed landscape, you will have the freedom to enjoy new plants as they are introduced and you will always have new plants to be excited about.

Caring for Annuals, Perennials, and Biennials

While the differences between annuals, perennials, and biennials may seem clear, different plants can have different lifespans based on the exact cultivar, gardening zone, climate variations, and even microclimates within an individual landscape. Furthermore, the care plants receive can ensure they reach their maximum potential for the longest, most productive life. YOUR GARDEN CENTER (insert IGC here) experts can provide recommendations and guidance for the best plants based on your preferences and needs and assist you in choosing plants that will thrive in the conditions of your yard, including soil type, sunlight levels, fertilization, moisture levels, and other needs. To provide each type of plant the best care, consider…

  • Annuals – Provide nourishing fertilizer formulated for the type of plant, and weed around them carefully so these fast-growing plants don’t need to compete for moisture and nutrition. Soaker or dripper hoses can also provide great watering as these plants flourish.
  • Perennials – Be sure these plants have adequate space in the landscape to reach their full size. Good quality mulch can help protect the roots each winter so the plants remain healthy for the next spring.
  • Biennials – Take care to provide appropriate fertilizer for these plants in their different life stages, and mulch around those with basal leaves to provide good winter protection during their dormancy.

Adding annuals, perennials, and biennials to your landscape will not only help you learn about plant lifespans, but you will enjoy a more varied and richly diverse landscape, with plants that provide beauty through the years.