


Do you love fresh, seasonal bouquets straight from the garden but don’t have the time to plan, plant and tend to an annual cutting plot each year? A fabulous alternative to the annual flower garden is the planting of woody shrubs. Woodies are a great investment that will reward you year after year with little maintenance. These are hardy, easy care shrubs whose flowers, foliage, berries and stems may be cut, without damaging the overall plant. Clippings from these plants may be used alone, in bouquets and arrangements or mixed with the annual and perennial flowers that you do have time to nurture and grow. No matter what the season, there are amazing shrubs that can easily become part of beautiful bouquets. Why not choose one of each for year-round options?
Spring Bouquet Shrubs
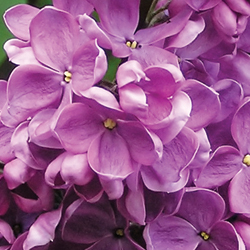
- Common Lilac (Syringa vulgaris): White, pink, lavender or variegated fragrant blooms depending on the cultivar.
- Flowering Quince (Chaenomeles speciosa): White, apricot, salmon, pink and red flowers depending on the cultivar. Branches may be forced.
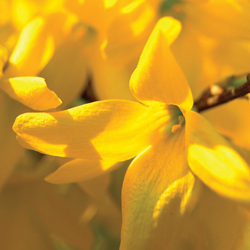
- Forsythia (Forsythia x intermedia): Yellow to gold flowers depending on the cultivar. Branches may be forced. Foliage may be used, after flowering, in the summer, winter and fall.
- Pussy Willow (Salix spp.): Soft, fuzzy catkins (flowers). There are also numerous Salix grown for their colorful and twisted stems.
Summer Bouquet Shrubs
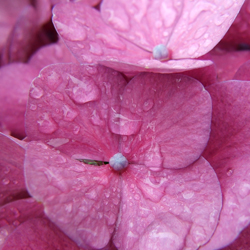
- Bigleaf Hydrangea (Hydrangea macrophylla): White, green, pink, blue and purple flowers depending on the cultivar and soil pH.
- Hardy Hydrangea (Hydrangea paniculata): White or pink flowers depending on the cultivar. If cut correctly, you may even get a second crop of blooms from this plant.
- Ninebark (Physocarpus opulifolius): Deep burgundy, lime green, bronze or coppery-orange foliage depending on the cultivar. Foliage may be used in the late spring through the fall.
- Smooth Hydrangea (Hydrangea arborescens): Large, white snowball-like flowers.
- Smokebush (Cotinus coggygria): Bluish-green to dark purple foliage depending on the cultivar with smoke-like flower panicles in June through August. Foliage is attractive from late spring through fall.
Fall Bouquet Shrubs
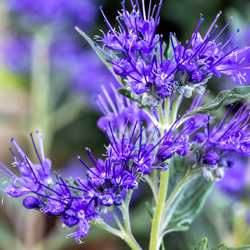
- Blue Mist Spirea (Caryopteris x clandonensis): Light, bright and deep blue flowers depending on the cultivar.
- Heavenly Bamboo (Nandina domestica): Full, drooping panicles of yellow or red berries depending on the cultivar. Foliage may be used any time of the year, even in winter as this plant is semi-evergreen, and takes on a purple or bronze cast in the cold weather.
Winter Bouquet Shrubs
- Bayberry (Myrica pensylvanica): Silvery blue berries.
- Twig Dogwoods (Cornus spp.): Yellow, gold, orange or red stems depending on the cultivar.
- Winterberry Holly (Ilex verticillata): Yellow, orange or red berries depending on the cultivar. Must plant a male pollinator in order for this plant to fruit.


 Orchids are some of the most exotic plants on earth. They display an amazing range of diversity in the size, shape and color of their unique flowers. There is a misconception, however, that these floral treasures are difficult to grow, when in fact more and more gardeners are growing and collecting orchids each year. Provide the essentials of good care and you too can grow orchids easily!

